4. All of which I am writing will also transfer over fine for doom III. The game engines are the same and the
mapping portion is very simular.
We are going to start by making a couple extra folders in your Q4base folder. We will be creating a "textures"
and "materials" folder. Make sure you dont have anything capitalized as Quake is very pickey! Here is what it
should look like:

Ok now that we have that out of the way we are going to go into our "textures" folder and create another
folder called "walls" You can name this folder anything you want but its better to keep everything organized
and name it somthing that it will contain. For instance if I also wanted to add some floor textures I might
have another folder in "textures" called "floors". This keeps everything organized in the editor so you can
find your textures quick. But if you dont have hundreds of custom textures then you could just make one folder
as we are going to do today, and usually I just name the folder the name of the map im making. Ok, so now we
have created a folder called "walls" it should look like this:

Ok, now that we have our folder structure out of the way we need to get our texture that we are going to use.
This first one I got from www.extrospection.com its a very nice brick texture that is going to look great when
we make the bumpmap for it.

Save this file somwhere on your desktop. we are going to open this in Adobe Photoshop CS2. If you dont have
that its ok, you will just have to follow along the best you can
photoshop. The textures size is 700x466 which is fine. When making textures you have to make sure its of a
power of 2. If you have an odd number for the image size its not going to work correctly. So first we are
going to make what is called our "diffuse map" all that is is your basic texture that will show in the game.
This texture is actually fine how it is so what we are going to do is save it in our "walls" folder inside our
"textures" folder. We are going to save it as "brick_d" the "_d" at the end of the name tells the game engine
its our diffuse texture. We will be saving the texture as a "targa" image of "24bits", Here are a couple pics
to show you.


Ok, now that we have our "diffuse map" we need to make a couple other textures. We are going to make the
"editor image" (The image you will see in the editor) and the "bumpmap" (Its going to add some depth to the
bricks to make them look more realistic)
First we are going to make the editor image. The editor image is a visual referance of the texture within the
editor. So with that said it really doesnt need to be that big. So open the brick pic that we opened to make
the diffuse texture. We are going to do two things to it. We are going to resize it and then save it. So lets
start out by resizing it. I will be resizing it to 100x67 pixels. This will save space and you will still be
able to see it in the editor. Now we are going to save this one exactly the same folder we did last time but
we are going to name it differnt. We will save it as "brick_ed".
So now you should have two tga's in your "walls" folder like this.

Ok now its the easy part! We are going to make the "bumpmap" which is going to look great with these bricks.
First I would like you to download this program from ATI which is a great time saver.
http://www.1337crush.com/ct/bumpmap.zip
Ok extract all the files into a folder named "bumpmap" on your desktop. We are going to use this to make the
bumpmap for our brick wall.
Ok now we are going to double click on "TGAtoDOT3.exe" this will bring up a box where we can pic the texture
we are going to make a bumpmap. Find your way over to the "walls" folder and pick the "brick_d.tga" file, then
click open. When you do that it will automatically make the bump map.


Now click cancel and go to your "walls" folder. YOu will see that the program named the file "brick_dDOT3.tga"
that is not what we want. We need to rename it to "brick_local.tga" Now your "walls" folder should look like
so:

Ok now that we have that out of the way we are goin to make the "material file" this tells the game where the
textures are and what file it should use as the Diffuse, specular, editor image, and bumpmap. In this first
tutorial with the bricks we will not be creating a specular map because that wouldnt look right. So now your
thinking "well what texture would look good with a specular map?" Metal would be a good choice because a
specular map actually reflects light. Bricks really dont reflect light and thats why we are going to skip
that. I will show how to make a specular map in my next tutorial.
Ok so go to your "materials" folder. We are going to make a new text document and call it "myleetmap.mtr" Make
sure you have "Hide extentions for known file types" unchecked.


Now that we have that done when we double click on it windows will not know what to use to open it, we are
going to select a program from a list. Then open it using "notepad". Here is what the material file should
look like inside, after you put this information in save it.

Here is what that folder should look like now.

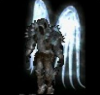
Ok, your all set! Close all your open folders and open The editor up. You should see your texture here:

And heres an in game shot!


If you have any questions or comments about this tutorial let me know. It cant be perfect cause its my first
one haha. Happy Mapping!