Like fire? MAKE IT WITH PHOTOSHOP!
1. Start by making a new document. I’m doing 400x300 with a black ground.
2. Select your Soft Round 9 pixel brush. (if you reset your brushes, it should be the 8th one. The color we want is just plain old white.
3. Draw a bunch of scribbly lines like so:

The easiest way to explain this: Start at the left side of the canvas, click and move up and down while going to right side of the canvas. Don’t go past halfway up though.
4. Click Filter> Blur> Motion Blur and use these settings:
Angel: 90
Distance: 70
5. Filter> Brush strokes> Sprayed strokes and use these settings:
Stroke length: 17
Spray radius: 17
Stroke direct: vertical
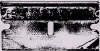
Hopefully, you have something similar to this:

6. Go to Filter> Pixelate> Crystalize with a cell size of 3
7. Filter> Blur> Motion Blur
Angel: 90
Distance: 15
8. Go to:
Image> Mode> Grayscale (if you get a message asking about the color, just click “ok” or “yes”.
Image> Mode> Indexed Color
Image> Mode> Color table and choose the one labled “black body”.
Image> Mode> RGB color
It should look similar to this now:

9. I always lower the saturation after this point. Unless you like the color,
Go to Image> Adjustments> Hue/Saturation. I turned down the saturation to –27.
10. Another optional step you can do:
Filter> Distort> Ripple
Amount: 85%
Size: medium
A lot of this will depend on your own liking though and the project you’re doing, so just experiment!
Final Result: